Using NVBase For Unified Search
Many of you have seen those shiny and cool Google search appliances which can index every aspect of your internal network, but did you know that you can get the same features from a piece of Open Source software called NVBase? NVBase is an application written in Java and using various libraries like jCIFS, Lucene, and JNDI to provide a complete enterprise search engine for your business. In this article, I will discuss how I installed and configured NVBase on an Ubuntu Linux application server, but you can just as easily install it on any other supported Java platform (such as Windows or Mac OS X).
One of the excellent features of NVBase is it's ease of Installation. In all honesty, there are no prerequisites!!! You just download the appropriate installer for your platform and run it. It contains all of the Java libraries, Java Virtual Machines, and the JBoss application server right there in the installer binary. So, where do you download the installer? Right HERE.
Once you have downloaded the appropriate installer, you just need to run it. On Ubuntu, this is as simple as double clicking on the file, but remember that this is a graphical installer, so you will need to have a local X Windows session. I just accepted all of the defaults and NVBase installed itself in the /opt/NVBase directory.
After installing, if you wish to be able to index Windows File Shares, you will need to configure the jCIFS options to match your network. I created a properties file and named it /opt/NVBase/jcifs.properties. In this file, I put the following lines:
Now that this file exists, you need to tell Java to load it on startup. I edited the /opt/NVBase/bin/NVBaseService file and changed the line
to
That's it for configuring the application to run properly, now we can start it up. Execute the /opt/NVBase/bin/NVBaseService script with the single argument of "start"
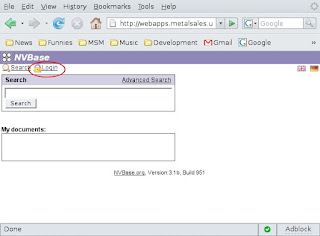
Now that the service has been started, we can use the web interface to configure what information it will index for searches. Open a browser window and type in "http://<your server address>:8080/" and press <ENTER>. You should see the search box and a few icons. You will want to click on the "Login" icon.
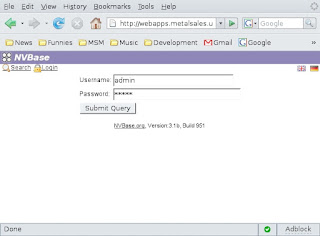
 When prompted enter "admin" for the username and "admin" for the password.
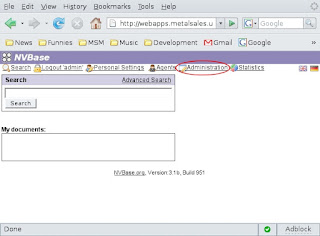
 Now that your are logged in, we administer the search engine. Do this by clicking on "Administration".
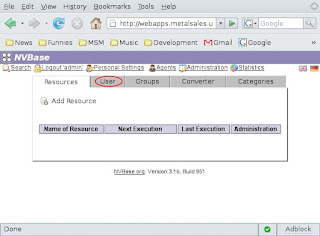
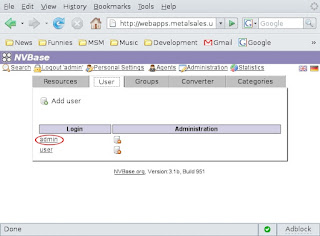
 It is highly recommended to change the default administrator password, so let's do that by clicking on the "User" tab.
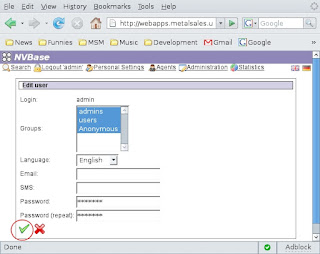
 Next, click on the "admin" user's name to bring up that user's options.
 Enter the new admin password and enter it again to confirm it.
 For now, I'm going to get a little lazy a direct you to the documentation page on the NVBase web site for further information on configuring resources. Eventually, I will come back and finish this tutorial up. So, without further adieu, click HERE.
One of the excellent features of NVBase is it's ease of Installation. In all honesty, there are no prerequisites!!! You just download the appropriate installer for your platform and run it. It contains all of the Java libraries, Java Virtual Machines, and the JBoss application server right there in the installer binary. So, where do you download the installer? Right HERE.
Once you have downloaded the appropriate installer, you just need to run it. On Ubuntu, this is as simple as double clicking on the file, but remember that this is a graphical installer, so you will need to have a local X Windows session. I just accepted all of the defaults and NVBase installed itself in the /opt/NVBase directory.
After installing, if you wish to be able to index Windows File Shares, you will need to configure the jCIFS options to match your network. I created a properties file and named it /opt/NVBase/jcifs.properties. In this file, I put the following lines:
jcifs.netbios.wins=
jcifs.smb.client.domain=
jcifs.smb.client.laddr=
jcifs.netbios.laddr=
jcifs.netbios.cachePolicy=
Now that this file exists, you need to tell Java to load it on startup. I edited the /opt/NVBase/bin/NVBaseService file and changed the line
vmoptions_val=""
to
vmoptions_val="-Djcifs.preoperties=/opt/NVBase/jcifs.properties"
That's it for configuring the application to run properly, now we can start it up. Execute the /opt/NVBase/bin/NVBaseService script with the single argument of "start"
dphillips@webapps:/opt/NVBase/bin$ ./NVBaseService start
Starting NVBaseService
dphillips@webapps:/opt/NVBase/bin$
Now that the service has been started, we can use the web interface to configure what information it will index for searches. Open a browser window and type in "http://<your server address>:8080/" and press <ENTER>. You should see the search box and a few icons. You will want to click on the "Login" icon.
 When prompted enter "admin" for the username and "admin" for the password.
 Now that your are logged in, we administer the search engine. Do this by clicking on "Administration".
 It is highly recommended to change the default administrator password, so let's do that by clicking on the "User" tab.
 Next, click on the "admin" user's name to bring up that user's options.
 Enter the new admin password and enter it again to confirm it.
 For now, I'm going to get a little lazy a direct you to the documentation page on the NVBase web site for further information on configuring resources. Eventually, I will come back and finish this tutorial up. So, without further adieu, click HERE.
Comments